How to Install Node.js on Windows
In this article, I will cover step-by-step how to setup Node.js on a Windows machine. I’ll finish off with a basic Node.js app to verify the installation. I’ve created this article using the following software versions:
- Node.js V0.10.33
- 64-bit Windows 8.1 Pro.
Download the Windows Installer
To get started with the installation go to the Downloads page at nodejs.org and select the appropriate Windows Installer (either 32-bit version or 64-bit version). I’ve included direct links below to version v0.10.33.
Run the Installation
Once you have downloaded the installer, navigate to the location where you saved the file in Windows Explorer and double click the .msi file.
You will see the installer welcome screen, from there click Next and you will be asked to accept the license terms.
After you accept the license terms, you will be prompted to specify which folder you want to install Node.js in. I am using the default location of C:\Program Files\nodejs\.
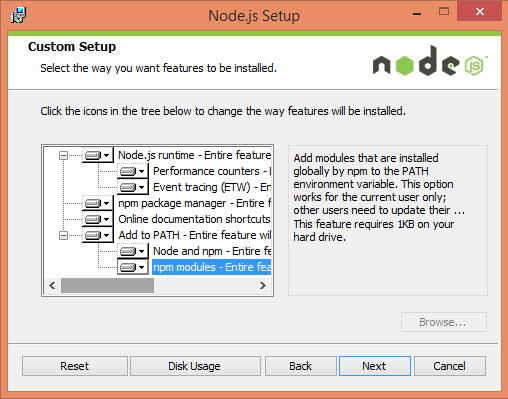
Click next again, and you will arrive at a screen to select which features you want to install. By default all features are selected (and this is what I would recommend to install the node.js core, documentation, and the npm package manager). Installing all features only requires ~30MB of space. When all features are selected, the installation window should look like the following:
Click Next, and on the subsequent screen click Install to begin the installation process. Once the installation has completed successfully, you are ready to create your first node.js code to validate the install.
Validating the Installation
Now that you have Node.js installed. Your next step is to create a simple node application to test your setup. Open your favorite editor and enter the following code:
|
1 2 3 4 5 6 7 8 9 10 11 12 13 14 |
var http = require('http'); http.createServer(function (request, response) { response.writeHead(200, {'Content-Type': 'text/html'}); response.write('<html>\n'); response.write('<head>\n'); response.write('</head>\n'); response.write('<body>\n'); response.write('<h1>Installation Working!</h1>\n'); response.write('</body>\n'); response.end('</html>'); }).listen(7000, '127.0.0.1'); console.log('Server running at http://127.0.0.1:7000/'); |
This code creates a simple HTTP server that will write a basic HTML document to the response object for every request to be sent back to the client.
For this example, I saved the above code in a file named ValidateInstall.js in the directory C:\NodeProjects\ValidateInstall. You could use a different filename or folder location if desired. Now it’s time to try running the application.
Running the App
1. Open a new command prompt window
2. Navigate to the folder where you saved the ValidateInstall.js file. In my case this was C:\NodeProjects\ValidateInstall\.
3. Enter the command at the command prompt – node ValidateInstall.js
4. Now open your web browser and navigate to http://127.0.0.1:7000. Your browser should display Installation Working!
Congratulations! You now have Node.js installed and have created a basic app to respond to HTTP requests.


